Tying a tie is a skill every man should master. Whether it’s for a job interview, a wedding, or a formal event, knowing how to tie a tie can make a significant difference in your appearance and confidence. This guide will walk you through the steps to tie various types of knots, ensuring you look sharp and polished.
The Importance of Knowing How to Tie a Tie
Ties are a staple in men’s fashion, symbolizing professionalism, elegance, and attention to detail. Mastering different tie knots can enhance your wardrobe and allow you to adapt to various occasions. Whether you’re a beginner or looking to refine your technique, this guide will provide you with clear, step-by-step instructions.
Basic Tie Knot: The Four-in-Hand Knot
Step-by-Step Instructions
- Start with the tie around your neck: The wide end should be on your right side, extending about 12 inches below the narrow end on your left.
- Cross the wide end over the narrow end: Bring it under the narrow end and back across the front.
- Bring the wide end up through the loop: Pull it down through the knot in front.
- Tighten the knot: Hold the narrow end and slide the knot up to adjust it neatly against your collar.
Advanced Tie Knot: The Windsor Knot
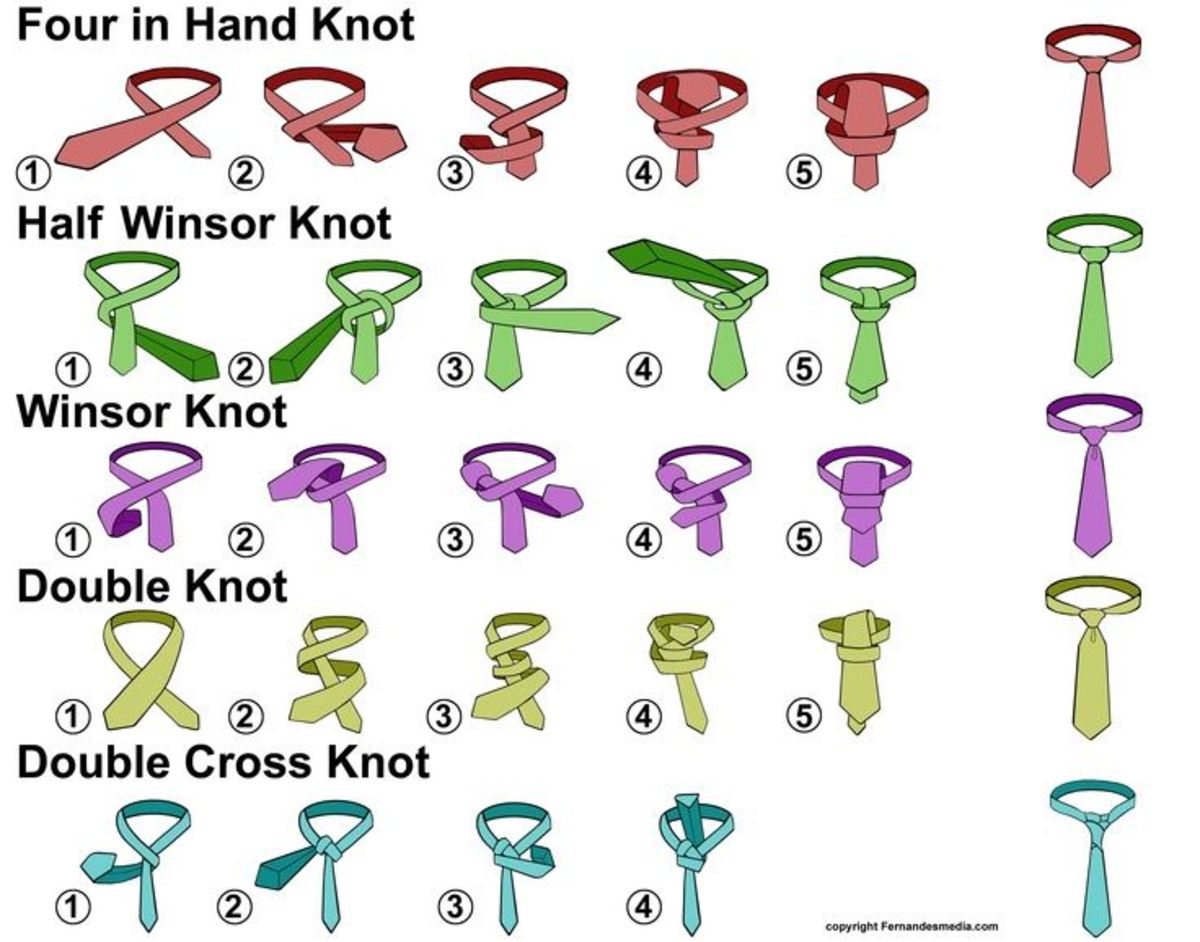
Step-by-Step Instructions
- Start with the tie around your neck: The wide end should be on your right, extending about 14 inches below the narrow end on your left.
- Cross the wide end over the narrow end: Bring it up through the loop between your collar and the tie, then pull it down.
- Bring the wide end under the narrow end: Pull it through the loop again, creating a symmetrical knot.
- Wrap the wide end around the front: Bring it up through the loop once more and pull it down through the knot in front.
- Tighten the knot: Adjust the knot by holding the narrow end and sliding the knot up to your collar.
Trendy Tie Knot: The Eldredge Knot
Step-by-Step Instructions
- Start with the tie around your neck: The wide end should be on your left, extending about 12 inches below the narrow end on your right.
- Cross the narrow end over the wide end: Bring it up through the loop between your collar and the tie, then pull it down.
- Wrap the narrow end around the back: Bring it horizontally across the front.
- Bring the narrow end up through the loop: Pull it down through the knot in front.
- Wrap the narrow end around the front: Continue wrapping until the knot is complete.
- Tighten the knot: Adjust the knot by holding the wide end and sliding the knot up to your collar.
Tips for Perfecting Your Tie Knot
- Practice makes perfect: The more you practice, the more natural tying a tie will become.
- Choose the right tie length: Ensure your tie is the appropriate length for your height and body type.
- Pay attention to symmetry: A well-tied knot should be symmetrical and centered.
- Use a mirror: Always tie your tie in front of a mirror to ensure accuracy.
- Experiment with different knots: Try various knots to find the one that suits your style and the occasion.
Knowing how to tie a tie is an essential skill that can elevate your style and confidence. By mastering different knots like the Four-in-Hand, Windsor, and Eldredge, you’ll be prepared for any formal occasion. Remember to practice regularly, choose the right tie length, and pay attention to symmetry for the perfect knot every time. With these tips and step-by-step instructions, you’ll be able to tie a tie like a pro.